
You can have all the bricks, seeds, and tools in the world, but if you don’t have a map, you’re just making a mess.
In my previous guide, I shared how we used cheap bricks to build borders and save money on materials. But before we laid a single brick at Dream Garden, we faced a much harder problem: The Layout.
When we stood in front of our empty field in early 2023, it was flat. Boring flat. The kind of flat where you stand at the gate and see everything in one glance. There was no mystery, no charm, and absolutely no reason to explore.
We realized that if we just started digging random holes, our garden would look like a patchwork quilt of mistakes. We didn’t have the budget for a landscape architect, so I went down a rabbit hole of research on “Garden Zoning.”
It turns out, you don’t need a degree to design a professional-looking space. You just need to understand how to divide your yard into “rooms.”
Why You Should Care About Garden Zoning
Think about walking into someone’s house. If the kitchen, bedroom, and bathroom were all in one big room with no walls, you’d feel weird, right? Confused about where to sit, where to cook, where to… exist.
That’s what an unzoned garden feels like.
When you create distinct sections (or “outdoor rooms”), something almost magical happens:
- Your space feels WAY bigger than it actually is.
- Guests wander around longer because there’s stuff to discover.
- Everything looks more expensive and intentional.
I’m not exaggerating about the size thing. Our property is only about half an acre, but visitors constantly ask if it’s bigger. One lady guessed two acres. All because she couldn’t see everything at once.
Step 1: Build Your Paths First (Yes, Before Planting Anything)
This was my biggest mistake in the beginning. I got excited and planted a bunch of marigolds in what I thought would be the flower section. Then I realized I’d put them exactly where people needed to walk. Had to dig them all up. Those marigolds did not forgive me—half of them died out of spite.
Here’s what you should do instead: Build your pathways first. The paths are basically your garden’s skeleton. They tell you (and your guests) where each section starts and stops.
Our “Curved Path” Strategy
We designed our walkway to snake through the flower beds rather than cut a straight line. As you can see in the photo, the path disappears behind the flowers and leads toward our bamboo pavilions.
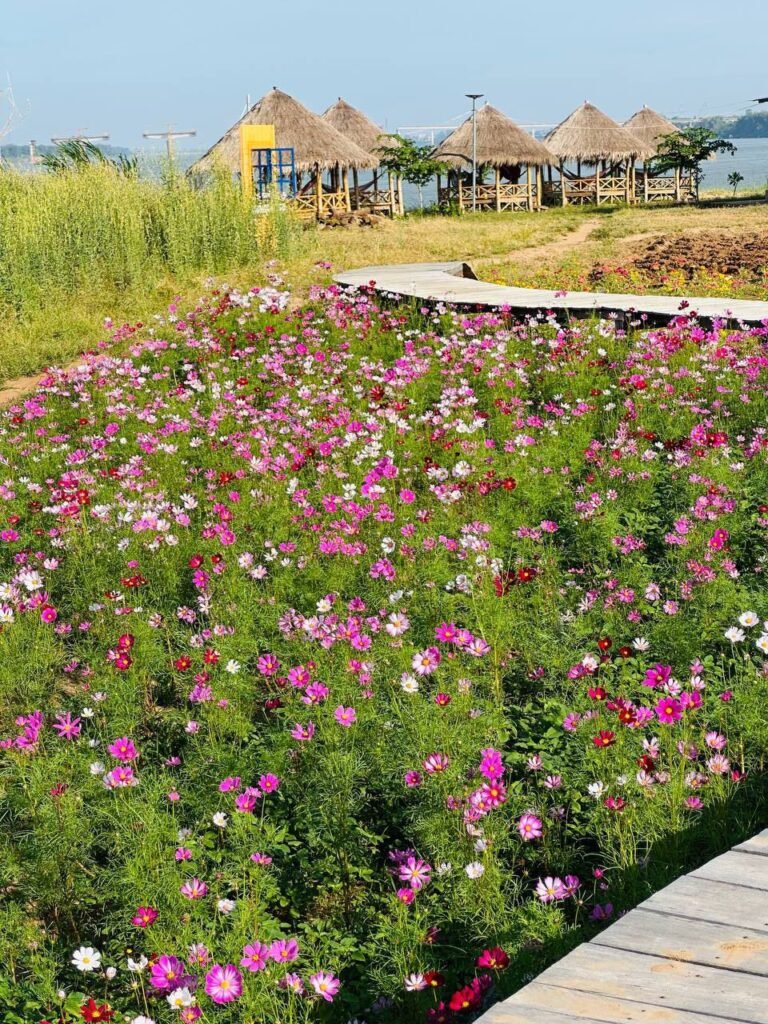
This makes a half-acre garden feel like a never-ending journey. Straight paths are efficient, sure. But they’re also boring. We made ours curved. Now, when you’re standing at the start, you can’t quite see what’s around the corner. It makes people curious. They keep walking just to see what’s next.
Budget-friendly path ideas if you’re broke like we were:
- Concrete blocks (we literally made our own in molds)
- Gravel between wooden planks
- Flat stones
- Bark mulch
The path we built automatically split our land into two zones: flowers on the left, chill-out area on the right. We didn’t plan it that perfectly—it just kind of happened once the path was down.
Step 2: Create Physical Borders (Or Watch Grass Eat Your Flowers)
In month two of Dream Garden, I learned a painful lesson about grass.
Grass is a silent killer. I’d planted this beautiful bed of cosmos flowers. Three weeks later, grass had crept into the bed from all sides like some kind of slow-motion home invasion. The cosmos were fighting for their lives.
You need borders. Clear, physical lines between “this is a flower bed” and “this is grass/walkway.”
The Star Garden Experiment
We had a pile of old bricks from a demolished wall. I was about to throw them out when my partner said, “What if we arrange them into a star shape?”
I thought she was joking, but we tried it. We laid the bricks flat on the ground in a star pattern—just a simple five-pointed star. Inside the star became our planting zone. Outside was the walking/grass area.

It looked adorable, honestly. But more importantly, it WORKED. The grass stayed on its side. The flowers stayed on their side. Peace in our time.
Step 3: Add Height to Block Views (AKA How to Create Mystery)
A completely flat garden is like reading a book where you can see all the pages at once. Where’s the fun in that? You need some sections where you CAN’T see what’s coming next.

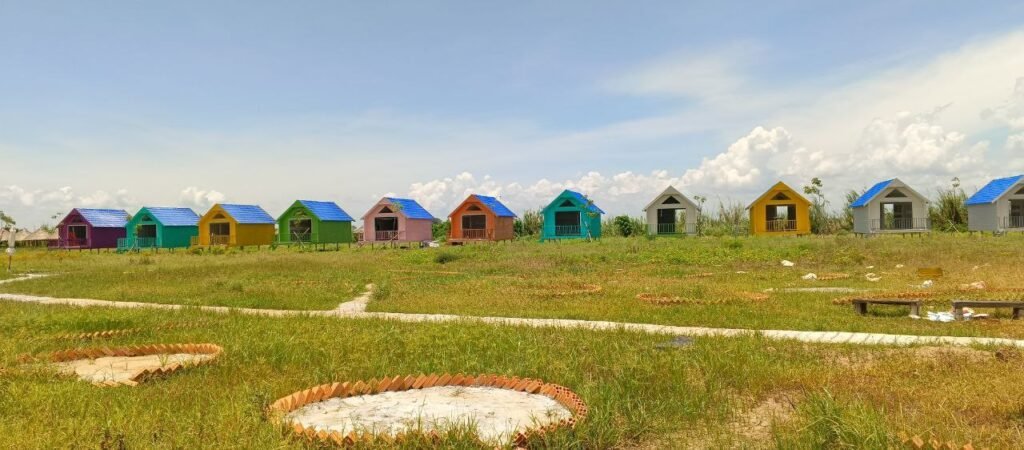
We used our guest cabins to physically block the view of the back river. This ensures that the riverfront remains a hidden surprise for guests who walk all the way to the end. The number of people who’ve said “Oh wow, I didn’t know there was a river!” is ridiculous. The river was always there. They just couldn’t see it at first.
Ways to Add Height Without Building Stuff:
- Tall plants: We used some native grasses that grow about 5-6 feet tall.
- Bamboo clusters: Bamboo creates instant green screens.
- Trellises: Build a simple bamboo trellis for climbing plants.
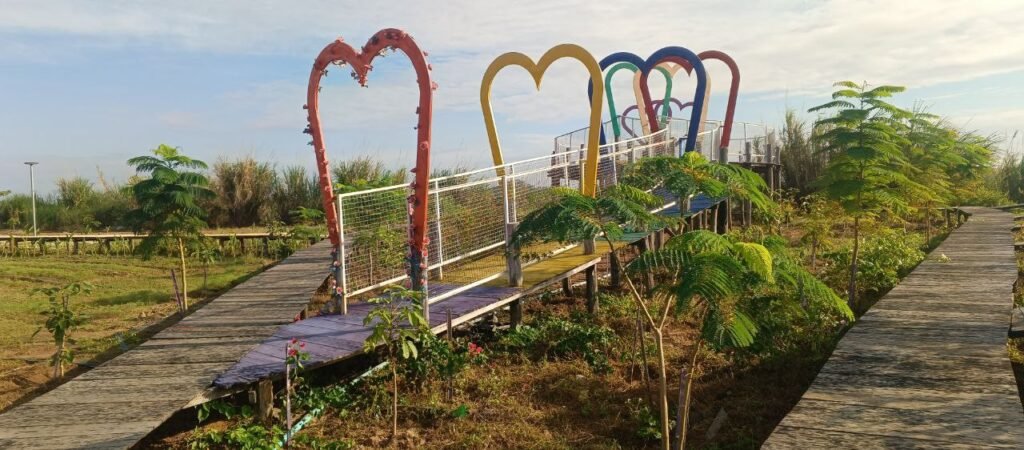
- Photo frames: Our rainbow heart arch works like a psychological doorway.
Step 4: Give Each Section a Job (Garden Zoning for Small Resorts and Homes)
Here’s where people get confused with DIY garden zoning. They create sections but don’t know what each section is FOR. Every zone needs a purpose.
At Dream Garden, we have three main zones:
Zone 1: The “Instagram Zone” (AKA the Wow Entrance)
Right at the entrance, we packed in our brightest flowers—zinnias, cosmos, marigolds. We put the rainbow heart photo frame here, too. This zone has ONE job: make people go “Whoa” and pull out their phones.
Zone 2: The Bamboo Relaxation Zone
Past the flowers, we transitioned into a calmer vibe. We built several open-air bamboo gazebos with thatched roofs.
Unlike the bright, high-energy entrance, this zone is earth-toned and shady. It has one job: giving people a place to sit, cool down, and enjoy the breeze.
Zone 3: The Wild River Section
Down by the water, we let nature do most of the work. Some wildflowers, tall grasses, and we don’t manicure it too much. This is MY zone. This is where I go at sunset with coffee and pretend I’m not stressed about business stuff.
How to Zone a Garden on a Budget: Start Stupid Small
Look, I need to be honest with you. When people visit Dream Garden now and see the whole setup, they sometimes assume we spent crazy money or had professional help.
In 2023, it was literally a mud field. We started with like $200 and a weekend. We didn’t build three zones at once. We built ONE corner.
- First weekend: We made a small gravel path (maybe 10 feet long).
- Second weekend: We added brick borders for one tiny flower bed.
- A month later: We installed the heart arch (which my partner almost dropped on my foot).
One section at a time.
If you’re standing in your yard right now feeling overwhelmed, here’s what I want you to do:
- Pick one corner.
- Decide what that corner is for (Photos? Relaxing?).
- Create a simple border around it.
- Plant or decorate that ONE section.
- Done.
Next month, do another corner. That’s how you build a dream garden—one section at a time, without going broke or losing your mind.