")
Running Dream Garden has taught me something important: you don’t need a big wallet to create something beautiful. Sometimes, the best low-budget garden ideas come from looking at what you already have.
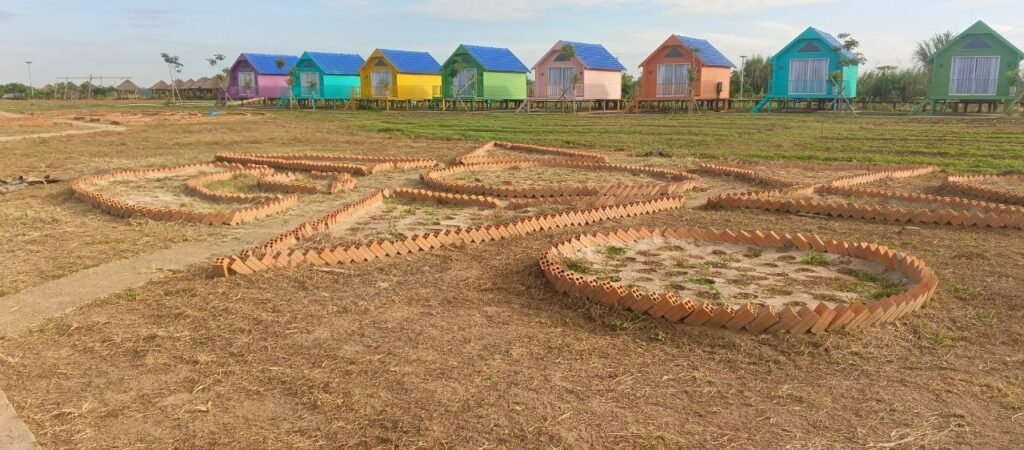
When we first opened our gates in 2023, visitors would compliment the view, but they would awkwardly stand around the edges of the property. We realized the problem wasn’t the view—it was the layout. We had a “big flat field” problem. Without defined borders, paths, or flower beds, a garden just feels like… a lawn.
I sat down with my team one afternoon and said, “We need flower borders. Something that looks intentional. Something that makes people stop and take a photo.”
Someone suggested buying those nice concrete planters you see at garden centers. We got excited until we actually looked up the prices. For the scale we needed (covering about 200 square meters), we were looking at $800, maybe more.
We didn’t have $800. We barely had $80.
This is the story of how we used trash, leftovers, and a little bit of geometry to build our signature “Star Garden” for almost zero money.
Our DIY Inventory: Using What We Had
Before spending a dime, we did a “scrap inventory.” If you are on a budget, I highly recommend doing this. Walk your property and look at your “junk” with new eyes.
Here is what we found:
- A huge pile of old bricks: Leftover from a wall we demolished months ago. They were chipped and messy, but free.
- 10 empty paint buckets: We were going to throw them away.
- Three bags of cement: Someone had forgotten them in the shed (they were starting to harden, but still usable).
- Sand: We live near a river, so sand was free for us.
That’s when the plan formed. We would use the bricks to create sharp, geometric shapes (The Star), and the buckets to create soft, circular stepping stones.
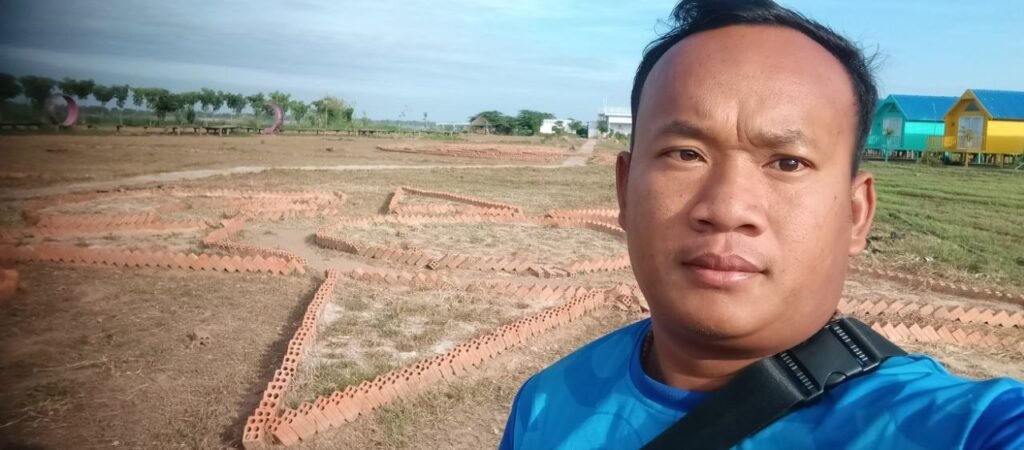
Phase 1: The “Star Garden” (The Brick Zigzag Technique)
We decided to create a massive star-shaped flower bed as our centerpiece. Why a star? Because circles are easy, but a star feels like a landmark. It forces you to look at it.
The “Zigzag” Locking Method
If you just line bricks up in a straight row, they fall over the moment a dog runs past them. You usually need mortar (cement glue) to hold them.
But we didn’t want to buy mortar. So we used the Zigzag Method.
- Dig a Trench: We dug a shallow V-shaped trench, only about 3 inches deep.
- Angle the Bricks: Instead of laying them flat, we stood them up at a 45-degree angle, leaning one brick against the next.
- The “Domino” Effect: Because each brick leans on the one in front of it, they lock each other in. Once you bury the bottom third in the soil, they become surprisingly rock-solid.
We laid out a massive five-pointed star. It took forever to get the angles right (we had to redo the points three times), but once it was done, it created a perfect, raised wall to hold our soil.
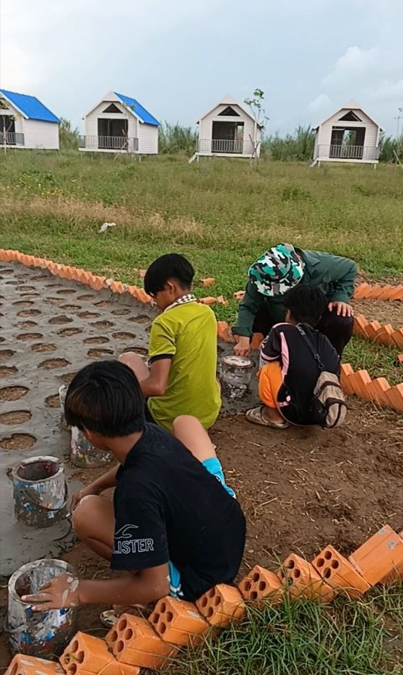
Phase 2: The “Paint Bucket” Trick (Making Concrete Circles)
For the outer sections, we wanted circular planting beds to contrast with the sharp angles of the star. But buying round concrete molds costs a fortune.
The Solution: We used old plastic paint buckets as molds.
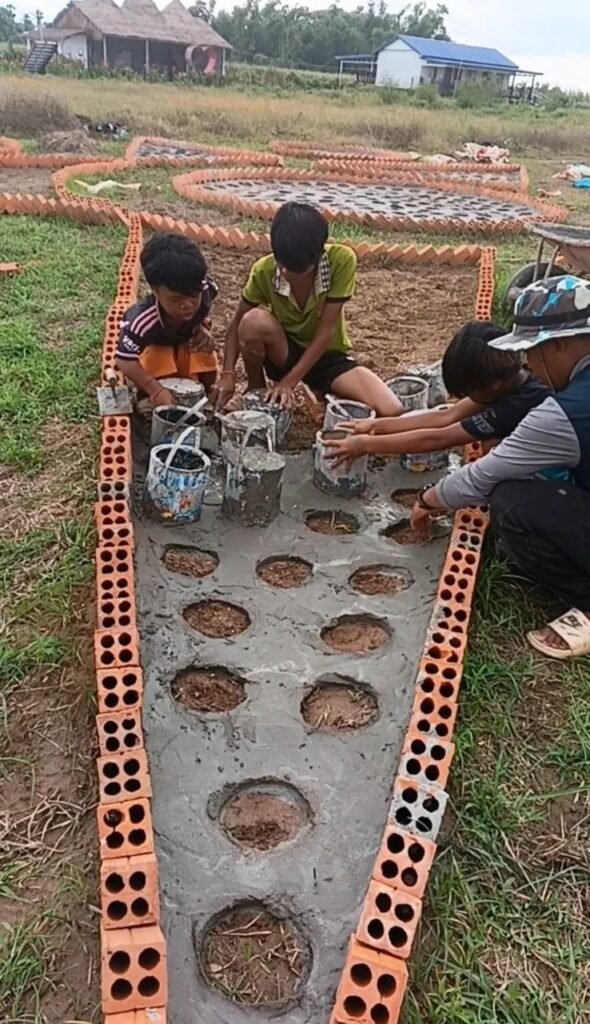
Step-by-Step: The Bucket Mold Technique
If you want to try this, here is exactly how we did it to avoid cracking the concrete:
1. Prepare the Ground
We leveled the dirt where each circle would go. If the ground is uneven, your concrete ring will crack when someone steps on it.
2. Oiling the Buckets (Crucial Step)
This is the mistake most beginners make. If you pour concrete around a plastic bucket, it will stick. We rubbed old cooking oil (or motor oil) on the outside of the buckets before placing them. This acts as a release agent.
3. The Pour
We placed the empty buckets on the ground. Then, we mixed our concrete and poured it around the base of the bucket, forming a ring about 4 inches thick.
A Note on the Concrete Mix: We mixed the concrete on-site. Standard advice is a 3:1 ratio (3 shovels of sand to 1 shovel of cement).
Honesty Check: Since we were on a tight budget, we actually stretched our mix to be a bit leaner (more sand). It’s not strong enough for a driveway, but for a garden border that no one walks on, it holds up just fine.
4. The Removal
We waited about 2 hours—until the concrete was firm but not 100% hard. We gently twisted the bucket handle. Thanks to the oil, they popped right out, leaving a perfect circular hole in the middle.
The Planting Strategy: Filling the Shapes
A border is just a frame; the flowers are the art.
Inside the Star: We planted Cosmos. These grow tall and chaotic. The sharp, rigid lines of the brick star contrast beautifully with the wild, waving pink cosmos flowers.
Inside the Concrete Circles: We planted Portulaca (Moss Rose). These are low-growing ground cover plants. They don’t block the view of the star, but they fill the concrete rings with bright pops of yellow and red color.
Maintenance: How It Holds Up 6 Months Later
A lot of DIY projects look great on Day 1 but fall apart by Day 100. Here is the honest truth about how this $50 project survived the rainy season.
The Bricks: The Zigzag bricks haven’t moved an inch. The grass does try to grow between the cracks, but because the bricks are loose (no mortar), we can easily pull the weeds out.
The Concrete Circles: Two of them cracked because the ground underneath wasn’t perfectly level. However, we just filled the cracks with a little dirt and let the flowers grow over them. It adds to the “rustic” look.
Cost Breakdown: What We Actually Spent
Let me be real with you about the costs so you can budget for your own yard:
- 3 bags of cement: $30
- Sand: Free (sourced locally)
- 600-ish bricks: Free (reused from old wall)
- 10 paint buckets: Free (saved from trash)
- Flowers (Seeds/Cuttings): $20
Total Project Cost: ~$50.
Compare that to hiring a landscaper, which would have cost us minimum $1,000 for materials and labor. We saved money, but we paid in sweat. My back was sore for a week, but every time I look at that star, I know we built it.
Your Turn: Look at Your “Trash” Differently
You don’t need to build a star. Maybe you just need a simple border for one flower bed.
The point is this: don’t let money stop you from improving your space. Before you go to the hardware store, look in your shed. Look behind the garage.
- Old tires? Paint them and stack them.
- Broken tiles? Make a mosaic path.
- Leftover bricks? Try the Zigzag method.
That’s how we are building Dream Garden—one cheap, sweaty, creative project at a time.