")
Last month, I stood in our garden staring at a crooked bamboo heart. After five days of work, countless mistakes, and more than a few choice words, I finally understood something: building a heart shape is way harder than it looks.
But you know what? When those wildflowers bloomed around it a month later, every frustrating moment was worth it.
Today, I’m sharing exactly how we built our giant bamboo heart garden structure for just $40 in materials. I’ll walk you through what worked, what didn’t, and how you can avoid the mistakes that cost us three extra days.
Why We Built a Bamboo Heart Structure
After our bright pink garden rings became super popular with visitors, we wanted to add something different to Dream Garden. Something softer. Something that felt like it belonged in nature instead of standing out from it.
That’s when the idea hit us: a massive bamboo heart structure.
Not a painted, artificial-looking decoration. A real, natural bamboo frame that would blend beautifully with flowers while still giving people an amazing photo spot. The goal was simple: create a photo spot that felt romantic, peaceful, and completely natural.
Natural vs. Bold: Two Different Styles
When you’re adding structures to a garden, you basically have two choices:
- Bold and contrasting – Like our pink rings that pop against the greenery.
- Natural and harmonious – Structures that work with nature, not against it.
For this DIY project, we chose the natural route. By keeping the bamboo unpainted, it creates a warm, neutral frame that lets the colorful flowers be the stars.
Materials You’ll Need (Total Cost: $40)
Here’s everything we used for this low-budget garden project:
For the frame:
- 6 iron rods (20mm x 20mm size) – $27
- 6 large bamboo poles – $10
- Self-tapping screws – $3
For the garden:
- Flower seeds, 2 kilograms – $40
- Time for planting – 3 days
Total investment: $80 for the complete setup, including flowers. Not bad for a structure that stands 3.5 meters tall, right?
The Challenge: Why Hearts Are Tricky
Let me be completely honest with you. I thought this would take two days. It took five.
Here’s the problem with hearts: they need to be perfectly symmetrical. If one side is even slightly different from the other, the whole thing looks wrong. It looks broken. With a circle, you can be a little off, and it still looks fine. But hearts? Hearts are unforgiving.
We wasted three entire days trying to “eyeball it.” We’d bend the rods, stand everything up, step back, and realize the left side was higher than the right. Then we’d take it all down and start over.
The breakthrough came when we stopped guessing and started measuring. We drew a grid on the ground and forced ourselves to follow it exactly. That simple step saved us from even more wasted time.
Lesson learned: Don’t freestyle a heart shape. Measure it first. Trust me on this.
Step-by-Step: How to Build a Bamboo Heart
Ready to build your own? Here’s the process we followed.
Step 1: Build the Iron Frame
First, you need a strong skeleton. We used iron rods to create the basic heart outline.
Our measurements:
- Height: 3.5 meters (about 11.5 feet)
- Width: 3 meters
- Depth: 0.5 meters
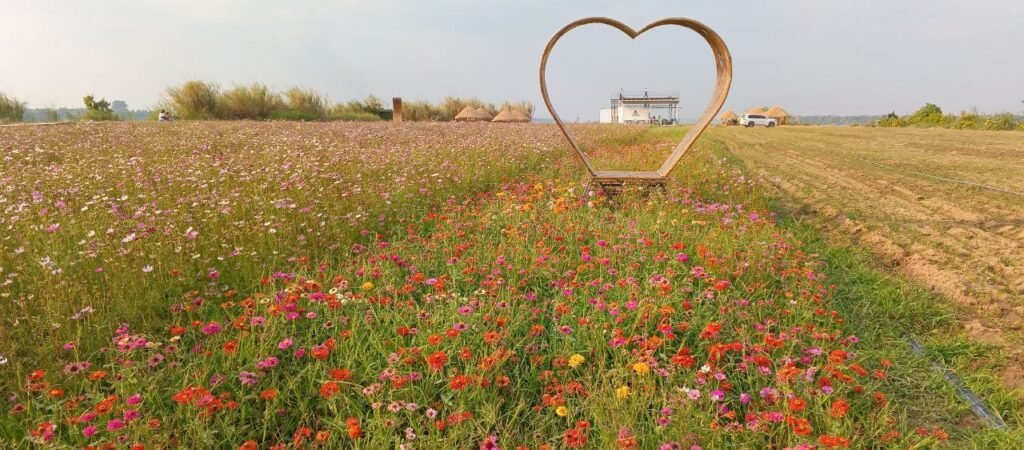
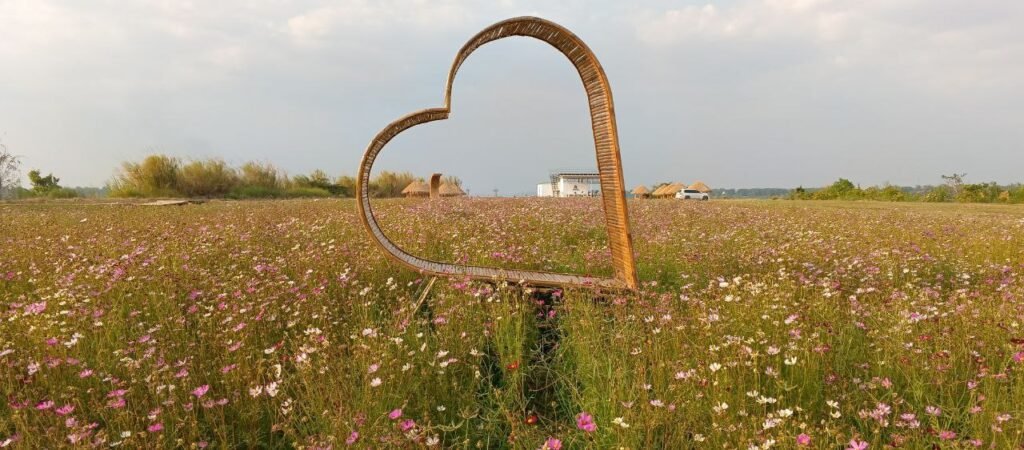
Wait, depth? Yes. This is important. We didn’t make a flat heart. We built it like a box frame with depth. This makes it much stronger against wind, and it looks way more impressive in photos. That half-meter depth transforms it from a flimsy wire into something that feels solid and architectural.
How we did it:
- Mark out your heart shape on the ground first (seriously, don’t skip this).
- Bend the iron rods to match your outline.
- Connect multiple rods to create the box frame structure.
- Make sure both sides are mirror images of each other.
Step 2: Add the Bamboo Covering
Now comes the fun part: transforming cold metal into warm, natural bamboo.
We took our 6 bamboo poles and cut them into strips. The trick is making them thin enough to bend but thick enough to stay strong.
The hardest part? The top of the heart, where it dips down in the middle. Bamboo doesn’t naturally want to bend that sharply.
We had to split it into even thinner, more flexible pieces for that section. We attached everything with self-tapping screws, wrapping the bamboo horizontally around the iron frame. This completely hides the metal and gives you that beautiful, textured wood look.
(Note: In some versions of this project, we also added layers of dried straw over the bamboo for extra texture, as mentioned in our other tutorial).
Step 3: Create a Sitting Spot
See that flat area at the bottom point of the heart? That’s not just decorative.
It serves two purposes:
- Structural support – It holds the two sides of the heart together at the base.
- A photo bench – People can actually sit inside the heart for their pictures.
This turned out to be one of our best decisions. Visitors love being able to sit right in the middle of the structure.
Planting the Perfect Flower Background
A bamboo structure standing in bare dirt doesn’t look romantic. It looks sad and unfinished. The flowers are what bring this whole DIY bamboo heart structure to life.
Our Planting Strategy
We planted two types of flowers to create layers:
- In the back: Cosmos flowers. These grow tall and airy. They create a soft pink and purple haze behind the heart and add height without blocking the structure.
- In the front: Zinnia flowers. These stay shorter and bushier. They add bright pops of orange, red, and yellow, bringing texture to the foreground of photos.
We bought 2 kilos of mixed seeds and spent three days preparing the soil and planting. Then came the hardest part of any garden project: waiting. It took a full month for everything to bloom.
The Final Result
When those flowers finally opened up, I stood there with the biggest smile on my face.
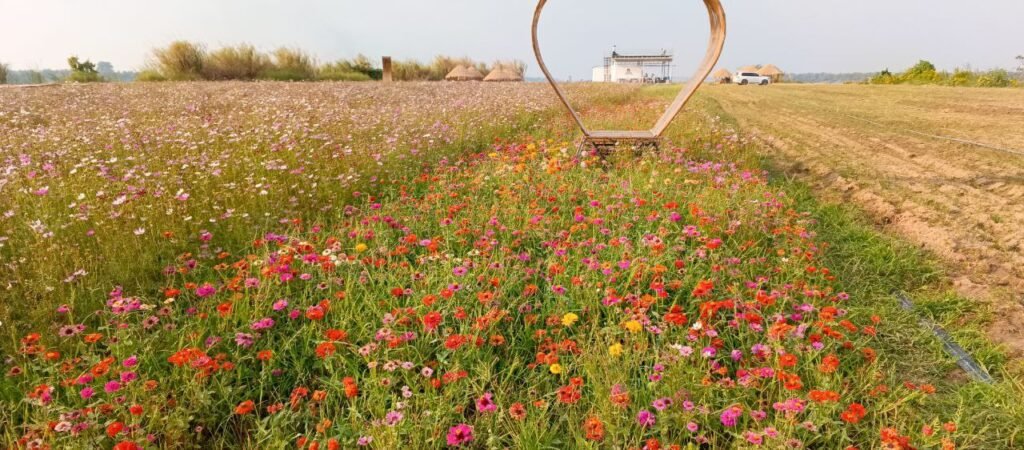
The natural tan color of the dried bamboo glows in the evening sunlight. Because we didn’t paint it, it doesn’t fight with the colorful flowers. Instead, it frames them perfectly.
People come to Dream Garden for different reasons. Some love our pink rings because they’re bold and fun. Others love the bamboo heart because it feels peaceful, romantic, and natural.
Both have their place. Both create amazing photos. But this bamboo garden structure has something special: it feels like it grew there, like it’s part of the landscape instead of just sitting on top of it.
What We Learned Building This
After five days of work and plenty of mistakes, here are the biggest lessons:
- Measure everything twice (or three times): That grid we drew on the ground? Should have done it on day one. Would have saved us three days of frustration.
- Depth makes all the difference: Building the structure with depth instead of making it flat was absolutely the right call. It looks professional, not homemade.
- Natural materials need patience: Bamboo doesn’t bend like metal. You have to work with it, not force it. Take your time splitting and shaping it.
- Flowers complete the picture: The structure alone is nice. The structure with blooming flowers? That’s magic.
- Mistakes are part of the process: Those three “wasted” days taught us how to do it right. Now we know exactly how to build another one if we want to.
Is This Project Worth It?
Let me answer that with a story.
Last week, a young couple got engaged in front of our bamboo heart garden structure. They’d been visiting Dream Garden for months, and he’d planned the whole thing around sunset when the light hits just right.
That moment right there? That made every frustrating day of building worth it.
This low-budget garden project transformed an empty patch of our garden into the most photographed spot we have. For $80 in materials and some hard work, we created something that brings joy to everyone who sees it.
If you’re looking for a garden photo spot idea that’s natural, romantic, and truly unique, I can’t recommend this enough. Just remember: measure twice, be patient, and don’t try to freestyle a heart shape.
Trust me on that last one.