
Last month, I watched three teenage girls spend twenty minutes trying to get the perfect photo at our resort. They weren’t photographing the sunset or the mountains. They were posing under our rainbow heart gate.
That’s when I knew we’d built something special.
If you’re running a resort or guesthouse and wondering how to create an Instagram-worthy spot without breaking the bank, let me share what we learned building our viral photo spot from scratch.
Why Every Resort Needs a Signature Photo Spot
Here’s the truth: guests already take photos everywhere. But when you give them one amazing spot designed specifically for pictures, something magical happens. They tag your location. They share it with friends. And suddenly, you’re getting free marketing.
Our resort photo spot design wasn’t planned by an expensive architect. We built it ourselves with basic materials, and it became the most popular feature at our property.
The Rainbow Heart Gate: What We Built
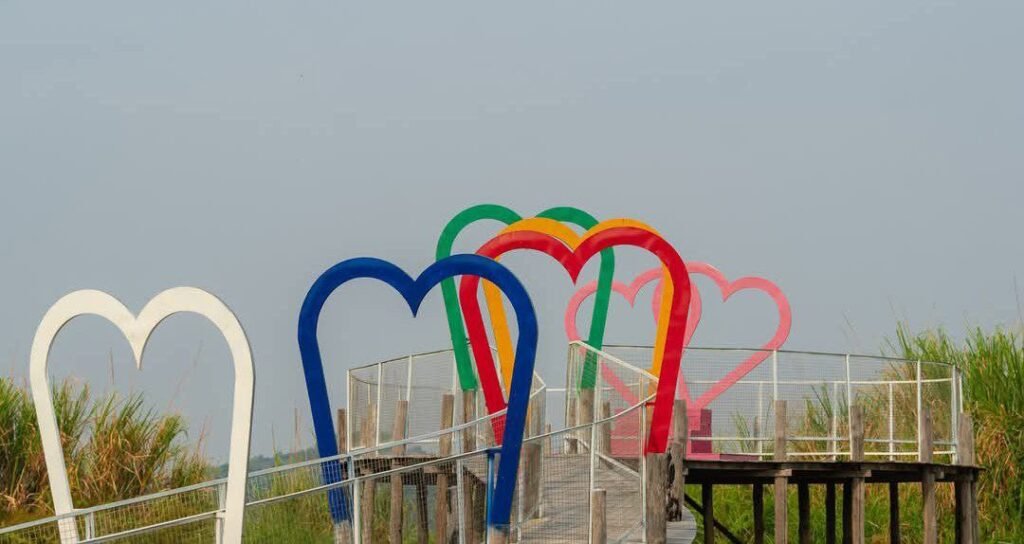
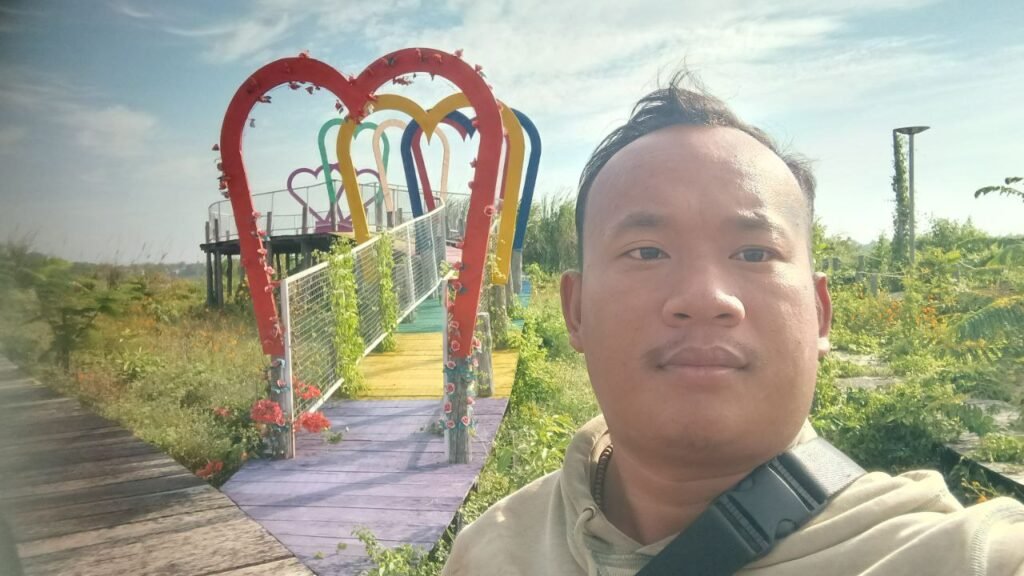
We decided to create a “Tunnel of Love” effect on the bridge connecting our cabins. We built five heart-shaped arches, each standing about 3 meters tall (roughly 10 feet) and 2.5 meters wide.
We chose this height because it’s tall enough to feel grand when you walk through it, but low enough that we didn’t need heavy industrial support beams.
DIY Heart Gate Design: Materials and Real Costs
I want to be honest about the budget. Since we made these approx. 3 meters high, we used standard steel lengths without much waste.
For the Arches:
- Steel: We used 20x20mm hollow steel tubes. They are lightweight but strong enough for this shape.
- Paint: 7 cans of outdoor oil-based spray paint (Bright primary colors).
- Welding Rods: approx $5.
We built five hearts total, so our complete materials cost was around $500-600. Compare that to hiring a landscape designer, who might charge $3,000-5,000 just for the design, plus construction costs. Our DIY approach saved us thousands.
Step-by-Step: How We Built It
Day 1-2: Planning and Cutting
We sketched the heart shape on paper first, then used that as a template. The key was getting the curve right so it actually looked like a heart and not just a weird blob. We cut the iron bars to length and marked where the bends were needed.
Day 3-4: Bending and Welding
This was the hardest part. We used a metal bender to curve the iron bars into a heart shape. It took practice to get both sides symmetrical.
Once the frame was shaped, we welded everything together. The base of each heart needed extra support since these structures catch wind.
Day 5: Adding Safety Features
We attached steel mesh along the sides of the bridge. This serves two purposes: it keeps kids safe and adds visual interest to photos.
Day 6-7: The Fun Part – Painting
We chose seven different colors intentionally. This way, no matter what color clothes someone wears, at least one heart will complement their outfit in photos. We used outdoor spray paint rated for metal and weather resistance. In tropical climates like ours, this matters a lot.
Cheap Resort Design Ideas That Actually Work
Building this taught us a few lessons about resort landscaping on a budget:
- Use what you have. We positioned the hearts to frame our existing cabins in the background. We didn’t build new structures; we enhanced what was already there.
- Think vertical. Height creates impact. Our 3-meter hearts are visible from the road, attracting curious visitors.
- Color is cheap. Paint costs almost nothing compared to renovations, but it has a huge visual impact.
- Build for function, not just looks. Our bridge actually connects two areas that guests need to walk between. It’s beautiful, yes, but it’s also useful.
What Makes a Viral Photo Spot Design
After watching hundreds of guests use our heart gate, I’ve noticed what works:
- It has to be big enough. Small decorations don’t photograph well. Go larger than you think.
- Natural lighting matters. We positioned our hearts where they get good light throughout the day, especially during golden hour.
- Leave space for people. The arch design lets people stand inside the hearts or in front of them. Give guests options.
- Make it shareable. Bright colors and unique shapes stand out in social media feeds.
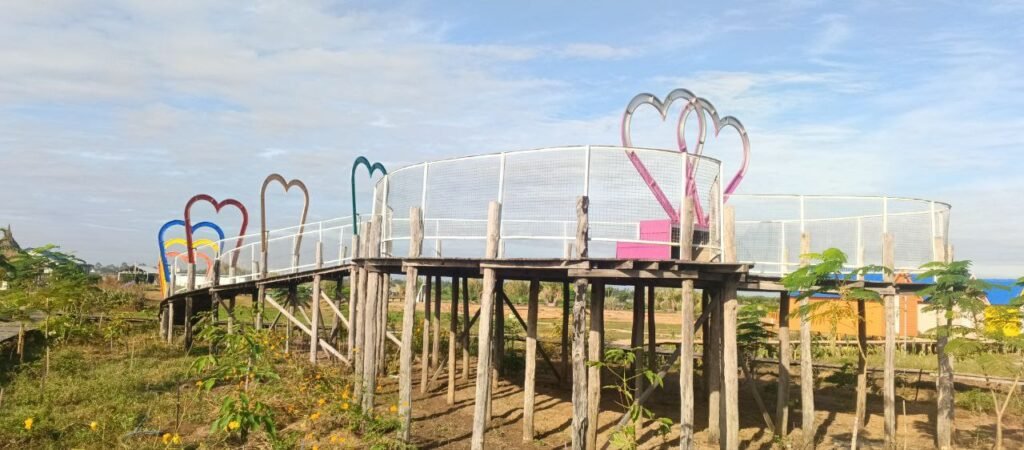
The “Grand Finale”: The Double Heart Seat
We didn’t just want a tunnel; we wanted a destination. At the very end of the bridge, we built a special photo platform.
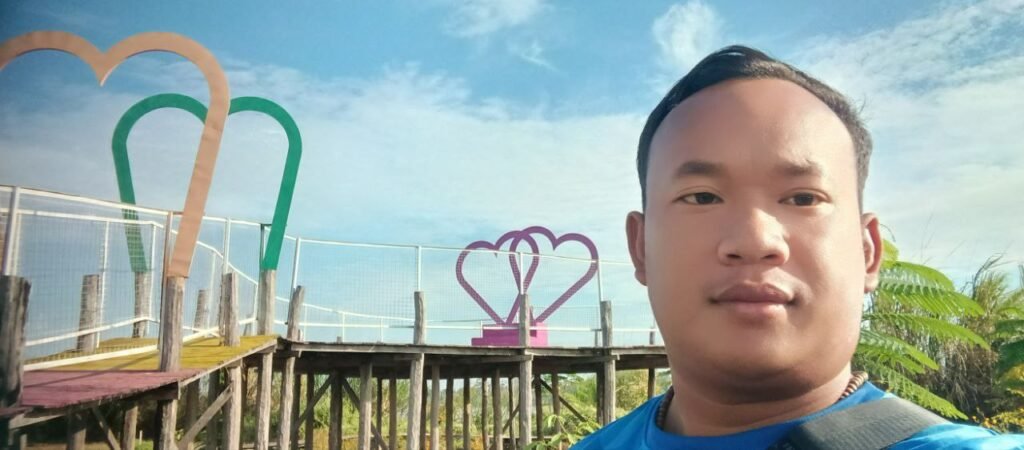
Instead of an arch you walk through, we built a Double Interlocking Heart that you sit inside.
We placed this on a widened platform at the end of the walkway so people could stop and pose without blocking the path for others.
Final Thoughts
Building our rainbow heart gate taught me that resort design doesn’t have to be expensive to be effective. Sometimes, the best features are the ones you create yourself.
Guests don’t care if you spent $500 or $5,000. They care about how the photo looks and how it makes them feel.
So grab some paint, sketch an idea, and start building. Your resort’s signature photo spot is waiting to be created.